Manage the network isolation of a workload
EDR enables you to manage the network isolation of a workload to stop lateral movement or Command and Control (C&C) activities. There are a number of isolation options to choose from, according to your requirements. Note that all Acronis Cyber Protect technologies are functional even if a workload is isolated, ensuring that an investigation can be fully carried out.
To isolate a workload from the network
- In the cyber kill chain, click the workload node you want to remediate.
- In the displayed sidebar, click the Response Actions tab.
-
In the Remediate section, click Manage network isolation.
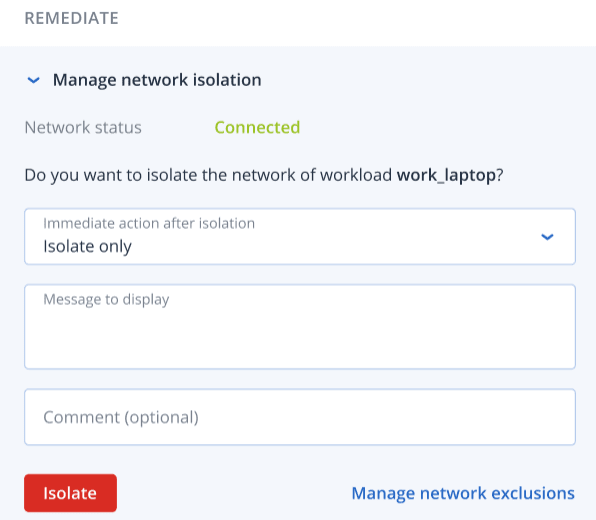
 The Network Status value indicates if the workload is currently connected or not. If the value displays Isolated, you can reconnect the isolated workload to the network, as described in the procedure below. If the workload is offline you can still isolate the workload; when the workload goes back online it is automatically put into the Isolated state.
 -
In the Immediate action after isolation drop-down list, select from one of:
-
Isolate only
-
Isolate and backup workload
-
Isolate and backup workload with forensic data
-
Isolate and power off workload
For more information about defining where to backup the workload and encryption options, see Managing the backup and recovery of workloads and files.
-
- [Optional] In the Message to display field, add a message to display to end users when they access the isolated workload. For example, you can inform users that the workload is now isolated and that network access in and out of the workload is currently not available. Note that this message is also displayed as a tray monitor notification, and remains displayed until the user dismisses the message.
- [Optional] In the Comment field, add a comment. This comment is visible in the Activities tab (for a single node or the entire incident), and can help you (or your colleagues) recall why you took the action when you revisit the incident.
- Click Manage network exclusions to add ports, URLs, host names, and IP addresses that will have access to the workload during the isolation. For more information, see how to manage network exclusions.
-
Click Isolate.
The workload is isolated. This action can also be viewed in the Activities tabs of both the individual node and the entire incident. For more information, see Understand the actions taken to mitigate an incident.
The workload is also shown as Isolated under the Workloads menu in the Cyber Protect console. You can also isolate single or multiple workloads from the Workloads > Workloads with agents menu; select the relevant workload(s) and in the right sidebar select Manage network isolation. In the displayed dialog, you can manage network exclusions and click Isolate or Isolate all to isolate the selected workload(s).
To connect an isolated workload back to the network
-
In the cyber kill chain, click the workload node you want to reconnect.
If the isolated workload is currently offline you can still reconnect it back to the network; when the workload goes back online it is automatically put into the Connected state. - In the displayed sidebar, click the Response Actions tab.
- In the Remediate section, click Manage network isolation.
-
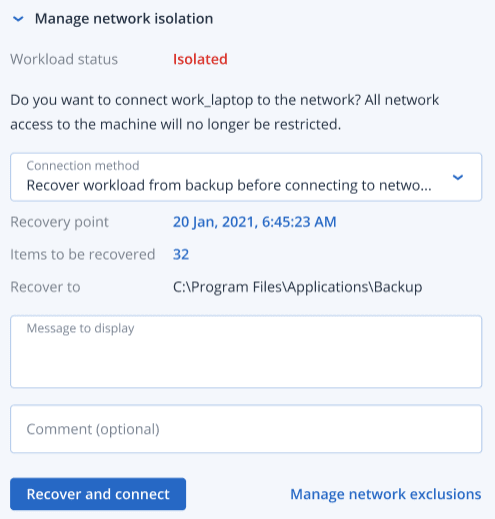
Select from one of the following:
- Connect to network immediately: The workload is reconnected to the network.
- Recover workload from backup before connecting to network: Select a recovery point from which to recover the workload.
- In the Recovery point field, click Select.
- In the displayed sidebar, select the relevant recovery point.
- Click Recover > Entire workload to recover all the files and folders on the workload.
Or
Click Recover > Files/folders to recover specific files and folders on the workload. You are then prompted to select the relevant files or folders. Once selected, you can view the list of items by clicking the relevant value in the Items to be recovered field.
 If the recovery point you select is encrypted, you will be prompted for the password.
- [Optional] Select the Automatically restart the workload if required check box. This option is relevant only if you selected Recover > Entire workload in Step 4.
- [Optional] In the Message to display field, add a message to display to end users when they access the connected workload. For example, you can inform users that a backup was restored to the workload and that network access in and out of the workload is resumed.
- [Optional] In the Comment field, add a comment. This comment is visible in the Activities tab (for a single node or the entire incident), and can help you (or your colleagues) recall why you took the action when you revisit the incident.
-
Click Connect if you selected Connect to network immediately in Step 4.
Or
Click Recover and connect if you selected Recover workload from backup before connecting to network in Step 4.
The workload is reconnected to the network and all network access to the workload is no longer restricted.
You can also connect single or multiple isolated workloads from the Workloads > Workloads with agents menu in the Cyber Protect console; select the relevant workload(s) and in the right sidebar select Manage network isolation. In the displayed dialog, click Connect or Connect all to reconnect the selected workload(s) to the network.
- In the Remediate section of the Response actions tab, click Manage network exclusions.
- In the Network exclusions sidebar, add the relevant exclusions. For each of the options available (Ports, URL address, and Hostname / IP address), do the following:
- Click Add and then enter the relevant port(s), URL addresses, or Hostname / IP addresses.
- In the Traffic direction drop-down list, select one of Incoming and outgoing connections, Incoming connections only, or Outgoing connections only.
- Click Add.
- Click Save.