The VPN appliance extends your local network to the cloud via a secure VPN tunnel. This kind of connection is often referred to as a "site-to-site" (S2S) connection.
To set up a connection via the VPN appliance
Click Devices > Cloud recovery site.
Click Start on the welcome page.
The system starts deploying the VPN server in the cloud, this will take some time. Meanwhile, you can proceed to the next step.
Note The VPN server is provided without additional charge. It will be deleted if the disaster recovery functionality is not used, i.e. no primary or recovery server is present in the cloud for seven days.
Depending on the virtualization platform you are using, download the VPN appliance for VMware vSphere or Microsoft Hyper-V.
Deploy the appliance and connect it to the production network.
In vSphere, ensure that Promiscuous mode is enabled and set to Accept for all virtual switches that connect the VPN appliance to the production network. To access this setting, in vSphere Client, select the host > Summary > Network > select the switch > Edit settings... > Security.
In Hyper-V, create a Generation 1 virtual machine with 1024 MB of memory. We also recommend enabling Dynamic Memory for the machine. Once the machine is created, go to Settings > Hardware > Network Adapter > Advanced Features and select the Enable MAC address spoofing check box.
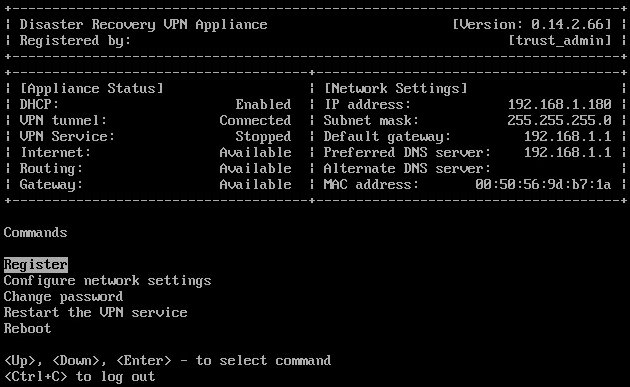
Power on the appliance.
Open the appliance console and log on with the "admin"/"admin" user name and password.
[Optional] Change the password.
[Optional] Change the network settings. You may want to assign the appliance a static IP address.
Register the appliance in the backup service by using the credentials of the company administrator.
These credentials are only used once to retrieve the certificate. The datacenter URL is predefined.
The appliance connects to the VPN server. Once the configuration is complete, the appliance will show the OK status.
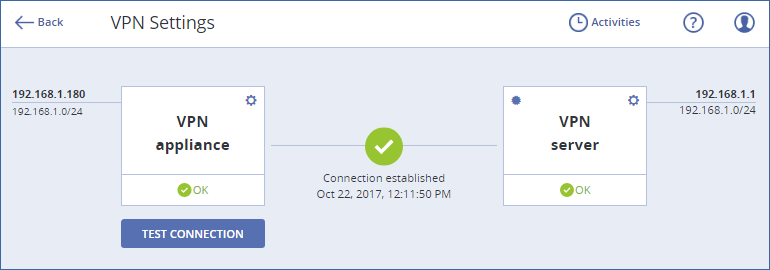
To test the VPN connection
Click Devices > Cloud recovery site.
Click VPN settings.
Ensure that the VPN appliance and the VPN server have the OK status.
Click Test.
The VPN appliance checks the connectivity to the VPN server. You see the list of tests being performed and their results.