Managing networks
Site-to-site Open VPN connection
To add a network on the local site and extend it to the cloud
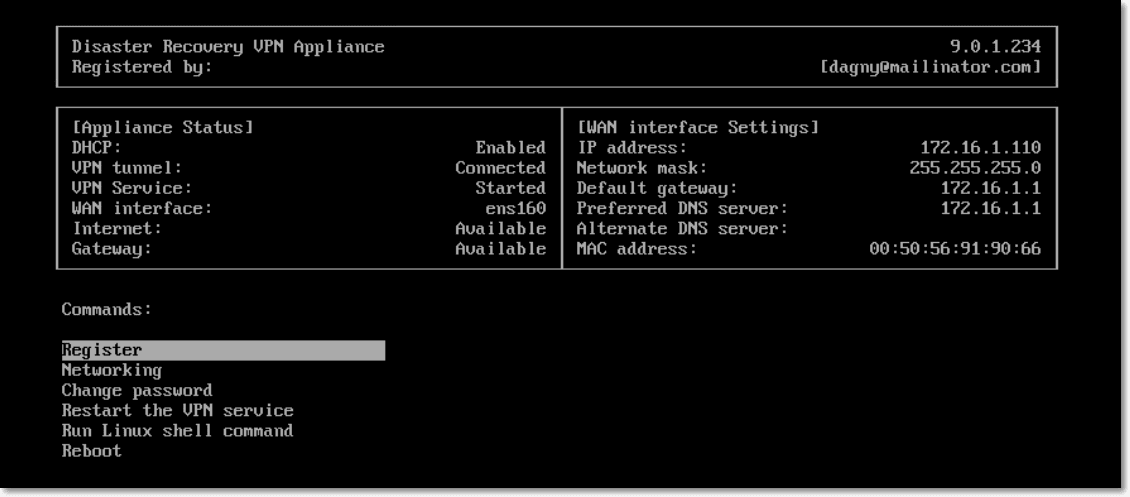
- On the VPN appliance, set up the new network interface with the local network that you want to extend in the cloud.
- Log in to the VPN appliance console.
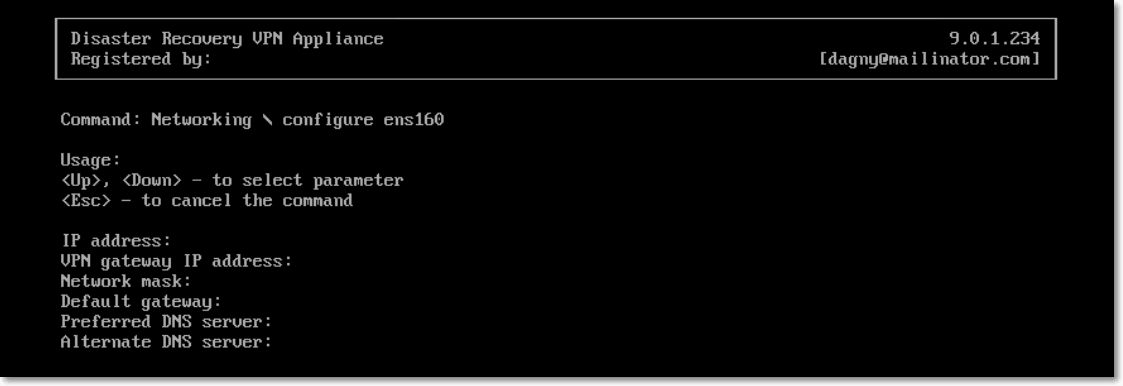
- In the Networking section, set up network settings for the new interface.

The VPN appliance starts to report information about networks from all active interfaces to Cyber Disaster Recovery Cloud. The service console shows the interfaces based on the information from the VPN appliance.
To delete a network extended to the cloud
- Log in to the VPN appliance console.
- In the Networking section, select the interface that you want to delete, and then click Clear network settings.
- Confirm the operation.
As a result, the local network extension to the cloud via a secure VPN tunnel will be stopped. This network will operate as an independent cloud segment. If this interface is used to pass the traffic from (to) the cloud site, all of your network connections from (to) the cloud site will be disconnected.
To change the network parameters
- Log in to the VPN appliance console.
- In the Networking section, select the interface that you want to edit.
- Click Edit network settings.
-
Select one of the two possible options:
- For automatic network configuration via DHCP, click Use DHCP. Confirm the operation.
-
For manual network configuration, click Set static IP address. The following settings are available for editing:
- IP address: the IP address of the interface in the local network.
- VPN gateway IP address: the special IP address which is reserved for the cloud segment of network for the proper Cyber Disaster Recovery Cloud service work.
- Network mask: network mask of the local network.
- Default gateway: default gateway on the local site.
- Preferred DNS server: primary DNS server on the local site.
- Alternate DNS server: secondary DNS server on the local site.

- Make the necessary changes and confirm them by pressing Enter.
Cloud-only mode
You can have up to 23 networks in the cloud.
To add a new cloud network
- Go to Disaster Recovery > Connectivity.
- On Cloud site, click Add cloud network.
- Define the cloud network parameters: the network address and mask. When ready, click Done.
As a result, the additional cloud network with the defined address and mask will be created on the cloud site.
To delete a cloud network
You cannot delete a cloud network if there is at least one cloud server in it. First, delete the cloud server, and then delete the network.
- Go to Disaster Recovery > Connectivity.
- On Cloud site, click the network address that you want to delete.
- Click Delete and confirm the operation.
To change cloud network parameters
- Go to Disaster Recovery > Connectivity.
- On Cloud site, click the network address that you want to edit.
- Click Edit.
- Define the network address and mask, and click Done.
IP address reconfiguration
For proper disaster recovery performance, the IP addresses assigned to the local and cloud servers must be consistent. If there is any inconsistency or mismatch in IP addresses, you will see the exclamation mark next to the corresponding network in Disaster Recovery > Connectivity.
Some of the commonly known reasons of IP address inconsistency are listed below:
- A recovery server was migrated from one network to another or the network mask of the cloud network was changed. As a result, cloud servers have the IP addresses from networks to which they are not connected.
- The connectivity type was switched from one without Site-to-site connection to a Site-to-site connection. As a result, a local server is placed in the network different from the one that was created for the recovery server on the cloud site.
- The connectivity type was switched from Site-to-site Open VPN to Multi-site IPsec VPN, or from Multi-site IPsec VPN to Site-to-site Open VPN. For more information about this scenario, see Switching connections and Reassigning IP addresses.
-
Editing the following network parameters on the VPN appliance site:
- Adding an interface via the network settings
- Editing the network mask manually via the interface settings
- Editing the network mask via DHCP
- Editing the network address and mask manually via the interface settings
- Editing the network mask and address via DHCP
As a result of the actions listed above, the network on the cloud site may become a subset or superset of the local network, or the VPN appliance interface may report the same network settings for different interfaces.
To resolve the issue with network settings
-
Click the network that requires IP address reconfiguration.
You will see a list of servers in the selected network, their status, and IP addresses. The servers whose network settings are inconsistent are marked with the exclamation mark.
- To change network settings for a server, click Go to server. To change network settings for all servers at once, click Change in the notification block.
- Change the IP addresses as needed by defining them in the New IP and New test IP fields.
- When ready, click Confirm.
Move servers to a suitable network
When you create a disaster recovery protection plan and apply it on selected devices, the system checks devices IP addresses and automatically creates cloud networks if there are not existing cloud networks where IP address fits. By default, the cloud networks are configured with maximum ranges recommended by IANA for private use (10.0.0.0/8, 172.16.0.0/12, 192.168.0.0/16). You can narrow your network by editing the network mask.
In case if the selected devices was on the multiple local networks, the network on the cloud site may become a superset of the local networks. In this case, to reconfigure cloud networks:
- Click the cloud network that requires network size reconfiguration and then click Edit.
- Reconfigure the network size with the correct settings.
- Create other required networks.
- Click the notification icon next to the number of devices connected to the network.
- Click Move to a suitable network.
- Select the servers that you want to move to suitable networks and then click Move.