Agent for VMware - LAN-free backup
If your ESXi uses a SAN attached storage, install the agent on a machine connected to the same SAN. The agent will back up the virtual machines directly from the storage rather than via the ESXi host and LAN. This capability is called a LAN-free backup.
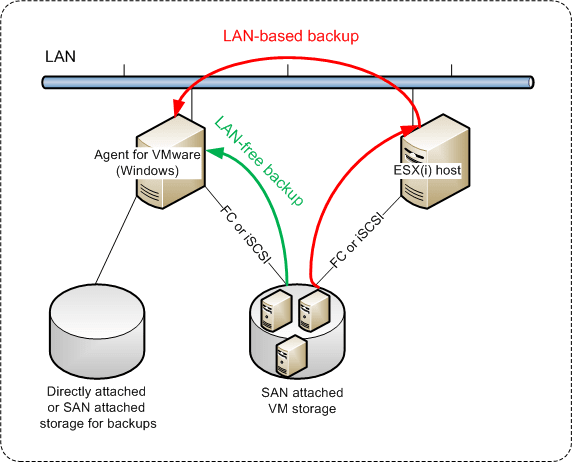
The diagram below illustrates a LAN-based and a LAN-free backup. LAN-free access to virtual machines is available if you have a fibre channel (FC) or iSCSI Storage Area Network. To completely eliminate transferring the backed-up data via LAN, store the backups on a local disk of the agent's machine or on a SAN attached storage.
To enable the agent to access a datastore directly
- Install Agent for VMware on a Windows machine that has network access to the vCenter Server.
-
Connect the logical unit number (LUN) that hosts the datastore to the machine. Consider the following:
- Use the same protocol (i.e. iSCSI or FC) that is used for the datastore connection to the ESXi.
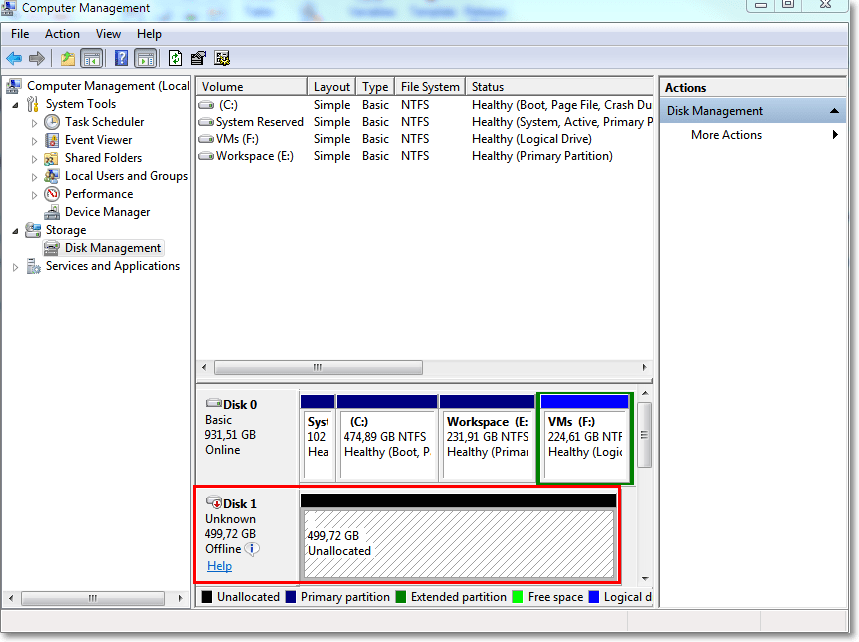
- The LUN must not be initialized and must appear as an "offline" disk in Disk Management. If Windows initializes the LUN, it may become corrupted and unreadable by VMware vSphere.
As a result, the agent will use the SAN transport mode to access the virtual disks, i.e. it will read raw LUN sectors over iSCSI/FC without recognizing the VMFS file system (which Windows is not aware of).
Limitations
- In vSphere 6.0 and later, the agent cannot use the SAN transport mode if some of the VM disks are located on a VMware Virtual Volume (VVol) and some are not. Backups of such virtual machines will fail.
- Encrypted virtual machines, introduced in VMware vSphere 6.5, will be backed up via LAN, even if you configure the SAN transport mode for the agent. The agent will fall back on the NBD transport because VMware does not support SAN transport for backing up encrypted virtual disks.
Example
If you are using an iSCSI SAN, configure the iSCSI initiator on the machine running Windows where Agent for VMware is installed.
To configure the SAN policy
- Log on as an administrator, open the command prompt, type
diskpart, and then press Enter. - Type
san, and then press Enter. Ensure that SAN Policy : Offline All is displayed. -
If another value for SAN Policy is set:
- Type
san policy=offlineall. - Press Enter.
- To check that the setting has been applied correctly, perform step 2.
- Restart the machine.
- Type
To configure an iSCSI initiator
-
Go to Control Panel > Administrative Tools > iSCSI Initiator.
To find the Administrative Tools applet, you may need to change the Control Panel view to something other than Home or Category, or use search.
- If this is the first time that Microsoft iSCSI Initiator is launched, confirm that you want to start the Microsoft iSCSI Initiator service.
- On the Targets tab, type the fully qualified domain name (FQDN) name or the IP address of the target SAN device, and then click Quick Connect.
-
Select the LUN that hosts the datastore, and then click Connect.
If the LUN is not displayed, ensure that the zoning on the iSCSI target enables the machine running the agent to access the LUN. The machine must be added to the list of allowed iSCSI initiators on this target.
- Click OK.
The ready SAN LUN should appear in Disk Management as shown in the screenshot below.